


|
|
Arduino Nano R3 |
x 1 | |
|
|
Adafruit NeoPixel Ring: WS2812 5050 RGB LED |
x 1 | |
|
|
DFRobot I2C 16x2 Arduino LCD Display Module |
x 1 | |

|
GT-0903ASOBERTON INC.
|
x 1 | |
|
|
Pushbutton Switch, Momentary |
x 2 |

|
Soldering Iron Kit |
|

|
arduino IDEArduino
|
Mini Cyclone Game on WS2812 LED Ring and Arduino Nano
This game is based on the Cyclone arcade game, where the player tries to stop an led scrolling around a circle at a specific spot.
In one of my previous videos(https://youtu.be/1K0vr-hrh0k), I presented you the same game, but on a large ring consisting of 60 Leds, which contained several levels.

This time I use a small ring with 12 Leds and the game does not contain levels but is a continuous game until once the target marker is not hit.

In addition, there is an LCD display that shows highscore and current round.
The code was taken from Joern Weise's GitHub page (https://github.com/M3taKn1ght/Blog-Repo/tree/master/Cyclone), and I made some modifications.
First I shortened the way of testing the LEDs, and then added different sounds for each segment of the game so that it is now much more interesting.
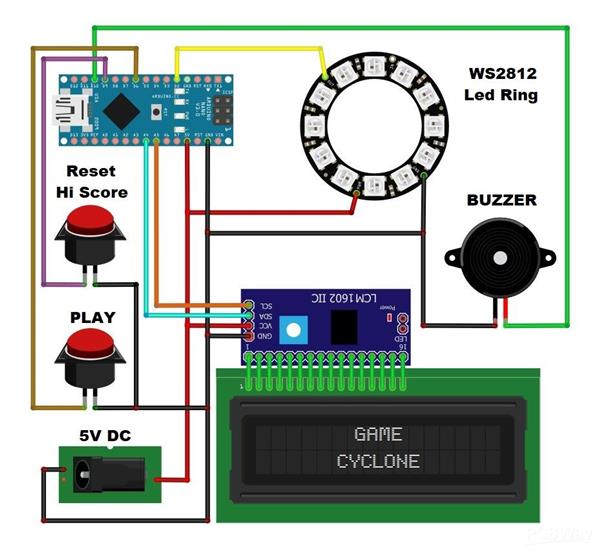
The device is very simple to build and consists of only a few components:
- Arduino nano microcontroller
- 12 Leds ring with WS2812 Led chip
- 16x2 LCD display with I2C communication protocol
- two buttons
- and Buzzer

If you want to make a PCB for this project, or for any other electronic project, PCBway (www.pcbway.com) is a great choice for you. PCBway is one of the most experienced PCB manufacturing company in China in field of PCB prototype and fabrication. They provide completed PCB assembly service with worldwide free shipping , and ISO9001 quality control system. Also, on their site there is an online gerber viewer where you can upload your gerber and drill files to render your board.

As for the gameplay, as I mentioned before, in this case there are no levels with increasing speed, but each successive round starts with a randomized speed, and generally the speeds can be easily changed in the code in the lines:
#define STARTINTERVAL 250 //"Normal" move
#define MAXINTERVAL 500 //Very slow move
#define MININTERVAL 50 //Very fast move

Now let's see how the device works in reality.
When turning on the game, all LEDs light up sequentially accompanied by an appropriate sound effect, and a corresponding message about the test on the LCD display.

Next, by pressing the button the game starts
The goal is to press the button at the moment when the rotating diode is located exactly on the static diodes.
In the first two levels, three diodes are static, and in the next levels only one.
The number of laps completed and the score are shown on the display.

If we fail to hit the red Led, the game ends, and High Score appears on the display.

The number of laps completed and the score are shown on the display.
Otherwise, the high score is recorded in the eprom of the microcontroller so that it is saved even after the reset.

If we want to delete the high score, when turning on, we hold down the HSR button.
And finally, the game is mounted on a PVC board with a thickness of 3 mm and covered with self-adhesive colored wallpaper.
//-----------------------------------------------------
// Game "CYCLONE" for Arduino
// Autor:   Joern Weise
// License: GNU GPl 3.0
// Created: 20. Sep 2020
// Update:  25. Sep 2020
// modified by mircemk 25. Feb 2022
//-----------------------------------------------------
//Include libraries
#include <Adafruit_NeoPixel.h>
#include <Wire.h>
#include <LiquidCrystal_I2C.h>
#include <EEPROM.h>

//Defines
#define NUMPIXELS   12  // Popular NeoPixel ring size or edit the number of LEDs
#define PIN         2   // Data-Pin to ring or strip
#define PINBTN      6   // Pin for Player-button
#define PINSCORERST 9   // Pin to reset score during first run

#define DISABLEWINDOW 3 //Rounds before the LED before and after target is not valid anymore

//Player-Dot speed defines
#define STARTINTERVAL 250 //"Normal" move
#define MAXINTERVAL 500   //Very slow move
#define MININTERVAL 50    //Very fast move

//Create objects
LiquidCrystal_I2C lcd(0x27,16,2);  // set the LCD adress
Adafruit_NeoPixel pixels(NUMPIXELS, PIN, NEO_GRB + NEO_KHZ800); //Init NeoPixel object

bool bFirstRun, bSecureWindow;
int iState = 1;
int iTargetPos, iPlayerPos, iStoredHighscore, iRound, iScore, iInterval;  //Vars for the game
int iLastButtonPressed, iButtonState, iDebounceButton;  //Vars to debounce button
unsigned long iLastPlayerMove, ulLastDebounceTime;      //Timer to debouce button
unsigned long ulDebounceButton = 10;                    //Debounce-time
int i = 0;
void setup() {
  Serial.begin(115200);
  Serial.println("Init serial communication: DONE");

  //Begin init for WS218B-ring or -strip
  pixels.begin(); // INITIALIZE NeoPixel strip object (REQUIRED)
  pixels.clear(); // Set all pixels to "off"
  pixels.setBrightness(20); // Set brightness to 20%
  pixels.show();   // Send the updated pixel colors to the hardware.
  Serial.println("Init WS218B-ring: DONE");

  //Begin init display
  lcd.init();
  lcd.backlight();
  lcd.clear();
  Serial.println("Init LCD display: DONE");

  randomSeed(analogRead(0));  // Make randome more randome
  Serial.println("Make randome more randome: DONE");

  //Read latest highscore from EEPROM
  iStoredHighscore = EEPROM.read(0);
  Serial.println("Last stored highscore: " + String(iStoredHighscore));

  //Init button with internal pullup-resistor
  pinMode(PINBTN,INPUT_PULLUP); //GameBTN
  pinMode(PINSCORERST,INPUT_PULLUP); //Reset-Pin for score

  //Init some basic-vars
  bFirstRun = true; //Enable firstrun
  iLastButtonPressed = digitalRead(PINBTN); //Init iLastButtonPressed
  iButtonState = digitalRead(PINBTN); //Init iButtonstate
}

void loop() {
  int iDebounceButton = DebounceButton(); //Check and debounce button

  if(!bFirstRun)
  {
    if(iState == 1) //Startscreen
    {
      bSecureWindow = true;
      iRound = 1;
      iScore = 0;
      iInterval = STARTINTERVAL;
      lcd.clear();
      lcd.home();
      lcd.print("Highscore: " + String(iStoredHighscore));
      lcd.setCursor(0,1);
      lcd.print("Press button ...");
      iState = 2;
    }
    if(iState == 2) //Get Button pressed
    {
      if(iDebounceButton == LOW)
      {
        if(iRound == 1) //Only show once during game
          Serial.println("-------- New game --------");
        lcd.clear();
        lcd.home();
        lcd.print("Release button");
        lcd.setCursor(0,1);
        lcd.print("to start");
        iState = 3;
      }
    }
    if(iState == 3) //Init next round
    {
      if(iDebounceButton == HIGH)
      {
        lcd.clear();
        lcd.home();
        lcd.print("Round: " + String(iRound));
        Serial.println("Round: " + String(iRound));
        lcd.setCursor(0,1);
        lcd.print("Score: " + String(iScore));
        Serial.println("Score: " + String(iScore));

        iTargetPos = random(0,NUMPIXELS-1);
        Serial.println("New target pos: " + String(iTargetPos));
        iPlayerPos = random(0,NUMPIXELS-1);
        while(iTargetPos == iPlayerPos)
          iPlayerPos = random(0,NUMPIXELS-1);
        Serial.println("Player start pos: " + String(iPlayerPos));
        iState = 4;
      }
    }
    if(iState == 4) //Draw target and playes dot
    {
      DrawNextTarget(iTargetPos, bSecureWindow);  //Draw new target
      DrawPlayer(iPlayerPos);                     //Draw player dot
      iLastPlayerMove = millis();                 //Update timer for moving
      iState = 5;
    }
    if(iState == 5) //Wait pressing button and move player dot
    {
      if(iDebounceButton == LOW)
      {
        iState = 6;
      }
      else
      {
        unsigned long currentMillis = millis();
        if(currentMillis - iLastPlayerMove > iInterval)
        {
          iPlayerPos++;
          if(iPlayerPos >= NUMPIXELS)
            iPlayerPos = 0;
          DrawNextTarget(iTargetPos, bSecureWindow);
          DrawPlayer(iPlayerPos);
          iLastPlayerMove = currentMillis;
        }
      }
    }
    if(iState == 6) //Check if player win
    {
      if(CheckPlayerPos())  //Winner or loser?
      {
        iScore++; //Update score
        tone(10, 3000, 100);
        iRound++; //Update rounds
        iState = 2; //Go back to release button
        if(iRound > DISABLEWINDOW)  //Only target
        {
          bSecureWindow = false;
          iInterval = random(MININTERVAL,MAXINTERVAL);
        }
        else
          iInterval = random(STARTINTERVAL-50,MAXINTERVAL);
        Serial.println("New interval: " + String(iInterval));
      }
      else
        iState = 90;
    }
    if(iState == 90)  //Game ends
    {
      Serial.println("Game ends");
      lcd.clear();
      lcd.home();
      iDebounceButton = HIGH;
      iLastButtonPressed = HIGH;
      iButtonState = HIGH;
      if(iScore > iStoredHighscore) //New highscore?
      {
        lcd.print("New highscore ");
        lcd.setCursor(0,1);
        lcd.print("New score: " + String(iScore));
        Serial.println("New highscore is " + String(iScore));
        EEPROM.write(0,iScore); //Store new highscore to EEPROM
        iStoredHighscore = iScore;
      }
      else  //Loser
      {
        lcd.print("Game Over");
        lcd.setCursor(0,1);
        lcd.print("You lose");
        Serial.println("You lose!");
         tone(10, 150, 1000);
      }
      Serial.println("-------- End game --------");
      delay(2000);
      iState = 1;
    }
  }
  else
    InitFirstRun(); //Init Firstrun to check LCD and WS218B-ring
}

//Function to make first run
void InitFirstRun()
{
  if(digitalRead(PINSCORERST) == LOW) //Overwrite EEPROM with "0"
  {
    Serial.println("Reset highscore");
    for(int iCnt = 0; iCnt < EEPROM.length(); iCnt++)
      EEPROM.write(iCnt,0);
  }
  Serial.println("---- Start init ----");
  lcd.home();
  lcd.print("Game Cyclone");
  Serial.println("Game Cyclone");
  lcd.setCursor(0,1);
  lcd.print("(c)  M3taKn1ght");
  Serial.print("(c)  M3taKn1ght");
  delay(1000);
  lcd.clear();
  lcd.home();
  lcd.print("    mircemk");
  Serial.println("For az-Delivery");
  lcd.setCursor(0,1);
  lcd.print("Testing ring ...");
  Serial.println("Testing ring ...");
  delay(1000);
  pixels.clear();
  //Check every single LED
  for(int i = 0; i<=51; i+=51)
  {
    InitRingTest(i,0,0);
    delay(50);
  }
//  pixels.clear();
//  for(int i = 0; i<=255; i+=51)
 // {
//    InitRingTest(0,i,0);
 //   delay(50);
  //}
//  pixels.clear();
 // for(int i = 0; i<=255; i+=51)
 // {
  //  InitRingTest(0,0,i);
  //  delay(50);
 // }
  pixels.clear();
  pixels.show();


  Serial.println("----  End init  ----");
  bFirstRun = false;
  Serial.println("bFirstRun: " + String(bFirstRun));
  Serial.println("Activate state for game");
}

//Simple function to check LED-Ring one by one
void InitRingTest(int iRed, int iGreen, int iBlue)
{
  Serial.println("R: " + String(iRed) + " G: " + String(iGreen) + " B: " + String(iBlue));
  for(int iPixel = 0; iPixel < NUMPIXELS; iPixel++)
  {
    pixels.setPixelColor(iPixel, pixels.Color(iRed, iGreen, iBlue));
    pixels.show();
        int thisPitch = map (iPixel , 0, 12,  1000, 3000);
       tone(10, thisPitch,120);
    delay(50);
  }
}

//Function to draw target an secure area for player
void DrawNextTarget(int iPos, bool bArea)
{
  pixels.clear();
  pixels.setPixelColor(iPos, pixels.Color(0, 255, 0));
  if(bArea)
  {
    if(iPos - 1 < 0)
      pixels.setPixelColor(NUMPIXELS - 1, pixels.Color(255, 136, 0));
    else
      pixels.setPixelColor(iPos - 1, pixels.Color(255, 136, 0));

    if(iPos + 1 >= NUMPIXELS)
      pixels.setPixelColor(0, pixels.Color(255, 136, 0));
    else
      pixels.setPixelColor(iPos + 1, pixels.Color(255, 136, 0));
  }
}

//Function to draw players LED
void DrawPlayer(int iPos)
{
  if(iPos == iTargetPos)  //target and player-dot is equal
    pixels.setPixelColor(iPos, pixels.Color(0, 0, 255));  //Dot color will blue

  else
    pixels.setPixelColor(iPos, pixels.Color(255, 0, 0));  //Otherwise red
  pixels.show();
  tone(10, 500, 50);
}

//Function to check after pressing button, if user hit the target
bool CheckPlayerPos()
{
  if(iTargetPos == iPlayerPos)  //Player hit target?

   return true;

  else
  {
    if(bSecureWindow) //LED before and after target active?
    {
      int iBeforeTarget = iTargetPos - 1;
      int iAfterTarget = iTargetPos + 1;
      if(iBeforeTarget < 0)
        iBeforeTarget = NUMPIXELS - 1;
      if(iAfterTarget >= NUMPIXELS)
        iAfterTarget = 0;
      if(iBeforeTarget == iPlayerPos || iAfterTarget == iPlayerPos)
        return true;
      else
        return false;

    }
    else
      return false;
  }
}

//Function to debounce button
int DebounceButton()
{
  int iCurrentButtonState = digitalRead(PINBTN);
  if(iCurrentButtonState != iLastButtonPressed)
    ulLastDebounceTime = millis();

  if((millis() - ulLastDebounceTime) > ulDebounceButton)
  {
    if(iCurrentButtonState != iButtonState)
      iButtonState = iCurrentButtonState;
  }
  iLastButtonPressed = iCurrentButtonState;
  return iButtonState;
}
Mini Cyclone Game on WS2812 LED Ring and Arduino Nano


- Comments(0)
- Likes(0)
More by Mirko Pavleski
-
 Dual MOT (microwave oven transformer) Tesla Coil
Tesla coils are known for their ability to generate visually impressive electrical arcs or sparks, ...
Dual MOT (microwave oven transformer) Tesla Coil
Tesla coils are known for their ability to generate visually impressive electrical arcs or sparks, ...
-
 ESP2866 controlled 8x32 matrix WS2812 Leds (Awtrix project)
The WS2812B is a individually addressable RGB LED that allows you to control each LED's color and b...
ESP2866 controlled 8x32 matrix WS2812 Leds (Awtrix project)
The WS2812B is a individually addressable RGB LED that allows you to control each LED's color and b...
-
 How to make simplest possible autorange Capacitance meter
The capacity measurement option is usually only available in more expensive multimeters, so it is d...
How to make simplest possible autorange Capacitance meter
The capacity measurement option is usually only available in more expensive multimeters, so it is d...
-
 How to turn mini Tesla Coil from Aliexpress into a Real Powerful SSTC with big spark
Some time ago I bought a mini tesla coil kit from an online store that cost less than $4. It's a ve...
How to turn mini Tesla Coil from Aliexpress into a Real Powerful SSTC with big spark
Some time ago I bought a mini tesla coil kit from an online store that cost less than $4. It's a ve...
-
 DIY Arduino ultrasonic Sonar - Radar on TFT display
Ultrasonic sonar is devices that use sound waves with frequencies higher than the upper audible lim...
DIY Arduino ultrasonic Sonar - Radar on TFT display
Ultrasonic sonar is devices that use sound waves with frequencies higher than the upper audible lim...
-
 Simple ESP32 Internet radio on VFD Display
Internet radio, also known as online radio or streaming radio, refers to the broadcasting of audio ...
Simple ESP32 Internet radio on VFD Display
Internet radio, also known as online radio or streaming radio, refers to the broadcasting of audio ...
-
 Short review of small music Tesla Coil with Bluetooth
A Solid State Tesla Coil (SSTC) is a type of Tesla coil that uses solid-state electronic components...
Short review of small music Tesla Coil with Bluetooth
A Solid State Tesla Coil (SSTC) is a type of Tesla coil that uses solid-state electronic components...
-
 Testing 2500W Large Induction Heater
An induction heater is a device that uses electromagnetic induction to heat objects. It consists of...
Testing 2500W Large Induction Heater
An induction heater is a device that uses electromagnetic induction to heat objects. It consists of...
-
 Arduino FFT Audio Spectrum analyzer on 8x32 color matrix WS2812B
The spectrum analyzer displays the amplitude of signals as a function of frequency, allowing engine...
Arduino FFT Audio Spectrum analyzer on 8x32 color matrix WS2812B
The spectrum analyzer displays the amplitude of signals as a function of frequency, allowing engine...
-
 Unusual Led Ring Arduino Clock, Temperature, and Humidity meter
There are many arduino clock projects with temperature and humidity readings where the results are ...
Unusual Led Ring Arduino Clock, Temperature, and Humidity meter
There are many arduino clock projects with temperature and humidity readings where the results are ...
-
 How to make simple portable PEMF Magnetic Pulser
PEMF (Pulsed Electromagnetic Field Therapy), which is also known as magnetic pulse therapy uses ele...
How to make simple portable PEMF Magnetic Pulser
PEMF (Pulsed Electromagnetic Field Therapy), which is also known as magnetic pulse therapy uses ele...
-
 Single Mosfet Mini SSTC Tesla coil with 10 + cm Spark
A Solid State Tesla Coil (SSTC) is a type of Tesla coil that uses solid-state components such as tr...
Single Mosfet Mini SSTC Tesla coil with 10 + cm Spark
A Solid State Tesla Coil (SSTC) is a type of Tesla coil that uses solid-state components such as tr...
-
 How to Make EM84 (6E2) Vacuum Tube Stereo VU Meter
A VU meter, also known as a Volume Unit meter, is a device used to display the audio signal level ...
How to Make EM84 (6E2) Vacuum Tube Stereo VU Meter
A VU meter, also known as a Volume Unit meter, is a device used to display the audio signal level ...
-
 Universal Arduino Staccato controller for SSTC and VTCC Tesla Coils
The VTTC Staccato Controller was developed in the attempt to create longer sparks from VTTCs while ...
Universal Arduino Staccato controller for SSTC and VTCC Tesla Coils
The VTTC Staccato Controller was developed in the attempt to create longer sparks from VTTCs while ...
-
 DIY extremly Sensitive and cheap Arduino Seismometer
A seismometer, is an instrument used to detect and record ground motion caused by seismic waves, su...
DIY extremly Sensitive and cheap Arduino Seismometer
A seismometer, is an instrument used to detect and record ground motion caused by seismic waves, su...
-
 DIY Extremly Sensitive and cheap Geophone sensor for Earthquakes detecting
A geophone is a device used in geophysics to detect ground movement. It is specifically designed to...
DIY Extremly Sensitive and cheap Geophone sensor for Earthquakes detecting
A geophone is a device used in geophysics to detect ground movement. It is specifically designed to...
-
 Arduino FFT Spectrum analyzer on VFD display GP1287
An audio spectrum analyzer is a device that visualizes the frequency content of an audio signal. It...
Arduino FFT Spectrum analyzer on VFD display GP1287
An audio spectrum analyzer is a device that visualizes the frequency content of an audio signal. It...
-
 DIY simple Spark Gap Tesla Coil
Tesla coil is a type of resonant transformer circuit invented by Nikola Tesla around 1891. It is a ...
DIY simple Spark Gap Tesla Coil
Tesla coil is a type of resonant transformer circuit invented by Nikola Tesla around 1891. It is a ...
-
Commodore 1551 Drive Cartridge Replacement
64 0 2 -
-
-
(DIY) COMMODORE 64 DEAD-TEST (781220) DIAGNOSTIC CARTRIDGE
310 0 2 -
Creative Micro Designs Inc. CMD FD-2000 / FD-4000 3D Printable Case
359 0 0 -
Creative Micro Designs Inc. CMD FD-2000 / FD-4000 Metal Case
523 0 0 -


